Use Claude Code to Add Crypto Payments to WooCommerce: Step-by-Step
Adding crypto payments to a WooCommerce store used to mean hours of plugin research, configuration headaches, and manual testing across multiple wallets. You would read documentation, compare half a dozen gateway plugins, configure API keys, customize checkout templates, and hope nothing broke on the next WooCommerce update. With Claude Code, you can compress that entire process into a single working session. The AI reads your WordPress installation, understands WooCommerce’s hook system, and walks you through every integration point, from plugin installation to webhook handling to a fully tested checkout flow.
Why WooCommerce + Crypto in 2026
WooCommerce powers more than 25 percent of all online stores worldwide, making it the largest open-source ecommerce platform by market share. That installed base matters because it means plugin ecosystems are deep, documentation is mature, and the payment gateway API is well-understood by developers and AI models alike.
On the crypto side, merchant demand for stablecoin and cryptocurrency payment options has grown steadily through 2025 and into 2026. Stablecoins alone processed $33 trillion in transaction volume in 2025, a 72 percent year-over-year increase. For WooCommerce merchants, accepting crypto addresses three specific pain points: chargeback fraud (crypto payments are irreversible), cross-border settlement fees (stablecoins settle in seconds for pennies), and currency conversion costs for international customers.
Non-custodial gateways take this a step further. Instead of trusting a third party to hold your funds, payments route directly to your wallet. No intermediary can freeze your balance, impose withdrawal limits, or go insolvent with your money. If you want a deeper look at why this matters for WooCommerce specifically, see our breakdown of 18 reasons to choose Aurpay for WooCommerce.
What Claude Code Brings to the Table
Claude Code is not autocomplete. It is a coding assistant that runs in your terminal, reads your entire project directory, and builds a mental model of your codebase before suggesting anything. For WordPress development, this means Claude Code can parse your wp-content/plugins directory, understand which WooCommerce version you are running, identify your active theme’s template structure, and map out the hooks and filters available for payment gateway integration.
The key mechanism is the CLAUDE.md file. You place this file in your WordPress project root with context about your setup: PHP version, WooCommerce version, active plugins, coding standards, and any custom modifications. Claude Code reads this file at the start of every session, giving it project-specific context that persists across conversations. Think of it as a briefing document that turns a general-purpose AI into a WordPress specialist who already knows your store.
This matters for payment integration because WooCommerce’s Payment Gateway API has specific conventions: gateway classes must extend WC_Payment_Gateway, hooks must be registered outside the class for reliability, and the newer Checkout Blocks require a separate JavaScript integration. Claude Code understands all of this and can guide you through the right approach for your specific WooCommerce version. For background on how AI agents connect to payment APIs through protocols like MCP, see our explainer on what MCP means for AI and payment APIs.
Prerequisites
Before starting, make sure you have the following in place:
- A WordPress site (version 6.4 or higher) with WooCommerce installed and activated (version 8.5+)
- SSH or local terminal access to your WordPress installation directory
- Claude Code installed on your machine (
npm install -g @anthropic-ai/claude-code) - An Aurpay merchant account with your API credentials ready
- A crypto wallet address for receiving payments (USDT, USDC, BTC, or ETH)
- WP-CLI installed (optional but recommended — Claude Code can use it for plugin management)
If you are working on a staging site, confirm that your WooCommerce store has at least one product and that you can complete a test checkout with a standard payment method. This baseline ensures any issues you encounter during crypto integration are specific to the payment gateway, not your store configuration.
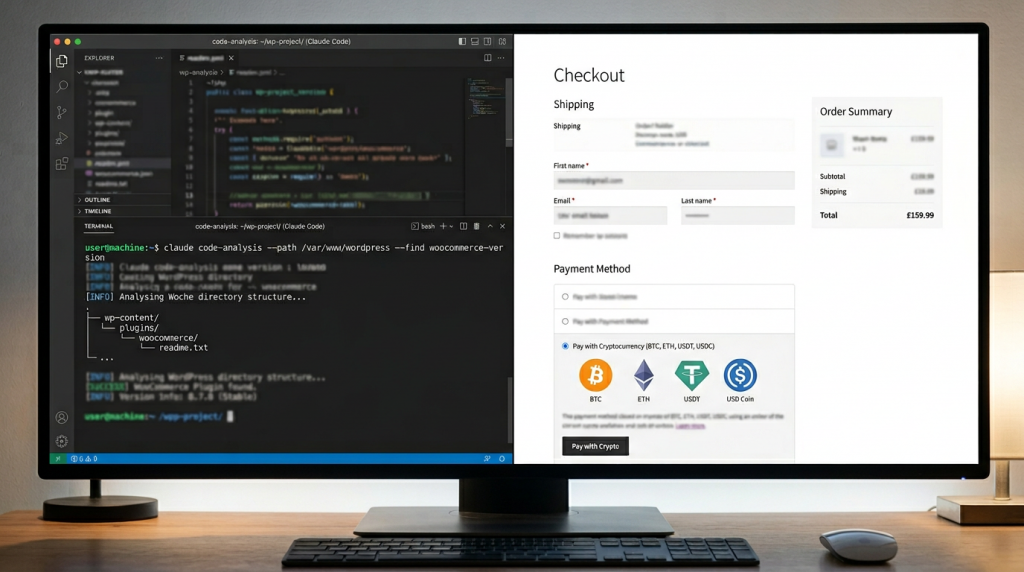
Step 1 — Let Claude Code Analyze Your Store
Open your terminal and navigate to your WordPress project root. Launch Claude Code and give it context about what you want to accomplish:
cd /var/www/html/your-wordpress-site
claude
Once Claude Code is running, start with a discovery prompt:
> Read my WooCommerce installation. What version am I running, what payment
  gateways are currently active, and what is my checkout page template structure?
Claude Code will scan your wp-content/plugins/woocommerce directory, read the main plugin file for version info, check your wp_options table configuration (if you give it database access or WP-CLI), and inspect your theme’s checkout templates. A typical response looks like this:
I've analyzed your WooCommerce installation:

- WooCommerce version: 9.6.1
- Active payment gateways: Stripe (stripe), PayPal (ppcp-gateway)
- Checkout: Using WooCommerce Blocks (not legacy shortcode)
- Theme: flavor flavor flavor flavor flavor flavor flavor flavor flavor flavor GeneratePress Child, no checkout template overrides
- PHP version: 8.2.15

Your store uses the block-based checkout, which means any new payment
gateway needs to register both a PHP gateway class and a JavaScript
payment method component for the checkout block.
This initial scan saves you from the most common integration mistake: building a payment gateway that only works with the legacy checkout shortcode when your store already uses WooCommerce Blocks. Claude Code catches this before you write a single line of code.
Step 2 — Install and Configure the Aurpay Plugin
With your store structure understood, ask Claude Code to handle the plugin installation:
> Install the Aurpay WooCommerce crypto payment plugin and walk me through
  the configuration. I want to accept USDT and USDC on Ethereum and Polygon.
If you have WP-CLI available, Claude Code will use it directly:
wp plugin install aurpay-cryptocurrency-payment-gateway --activateIf not, Claude Code will guide you through downloading the plugin from the Aurpay WooCommerce plugin page and activating it through your WordPress admin. Once activated, Claude Code reads the plugin’s settings structure and walks you through each configuration field:
> Now configure the plugin. My Aurpay Merchant ID is XXXXX and my API key
  is YYYYY. Set the payment timeout to 30 minutes and enable the testnet
  mode for now.
Claude Code can help you set these values programmatically through WP-CLI or guide you through the admin panel. For programmatic configuration, it generates something like:
// Set Aurpay configuration via WP-CLI
// Run: wp eval-file configure-aurpay.php

$settings = array(
    'enabled'       => 'yes',
    'title'         => 'Pay with Crypto',
    'description'   => 'Pay securely with USDT, USDC, BTC, or ETH.',
    'merchant_id'   => 'YOUR_MERCHANT_ID',
    'api_key'       => 'YOUR_API_KEY',
    'testnet'       => 'yes',
    'timeout'       => 1800,
    'networks'      => array( 'ethereum', 'polygon' ),
    'accepted_coins'=> array( 'USDT', 'USDC' ),
);

update_option( 'woocommerce_aurpay_settings', $settings );
echo "Aurpay configured successfully.\n";
The advantage of using Claude Code here is that it reads the plugin’s actual option keys from the source code rather than guessing. If Aurpay’s settings use woocommerce_aurpay_settings as the option name, Claude Code verifies this by reading the gateway class, not by assuming a naming convention.
Step 3 — Customize the Checkout Flow
The default Aurpay checkout experience works out of the box, but most merchants want to customize it. Common requests include adding crypto payment icons to the checkout and displaying the equivalent crypto amount before the customer commits. Ask Claude Code to handle these:
> Customize the checkout flow: add SVG icons for USDT and USDC next to the
  payment method title, and show the estimated crypto amount based on the
  current exchange rate before the customer clicks "Place Order".
Claude Code generates the customization as a small companion plugin or a theme functions snippet, depending on your preference. Here is a typical output for adding payment icons:
<?php
/**
 * Plugin Name: Aurpay Checkout Customizations
 * Description: Custom checkout enhancements for Aurpay crypto payments.
 * Version: 1.0.0
 */

defined( 'ABSPATH' ) || exit;

/**
 * Add crypto payment icons to the Aurpay gateway.
 */
add_filter( 'woocommerce_gateway_icon', function( $icon, $gateway_id ) {
    if ( 'aurpay' !== $gateway_id ) {
        return $icon;
    }

    $icons_url = plugin_dir_url( __FILE__ ) . 'assets/icons/';

    $icon  = '<img src="' . esc_url( $icons_url . 'usdt.svg' ) . '" alt="USDT" width="28" height="28" style="margin-right:4px;" />';
    $icon .= '<img src="' . esc_url( $icons_url . 'usdc.svg' ) . '" alt="USDC" width="28" height="28" />';

    return $icon;
}, 10, 2 );

/**
 * Display estimated crypto amount on checkout.
 */
add_action( 'woocommerce_review_order_after_order_total', function() {
    $total = WC()->cart->get_total( 'raw' );

    if ( $total <= 0 ) {
        return;
    }

    // Fetch current rate from Aurpay API or a public oracle.
    $rate = aurpay_get_exchange_rate( 'USDT', 'USD' );

    if ( ! $rate ) {
        return;
    }

    $crypto_amount = round( $total / $rate, 2 );

    printf(
        '<tr class="aurpay-crypto-estimate">
            <th>Estimated USDT Amount</th>
            <td>%s USDT</td>
        </tr>',
        esc_html( number_format( $crypto_amount, 2 ) )
    );
} );

/**
 * Fetch exchange rate (simplified example).
 */
function aurpay_get_exchange_rate( $coin, $fiat ) {
    $transient_key = 'aurpay_rate_' . strtolower( $coin ) . '_' . strtolower( $fiat );
    $cached = get_transient( $transient_key );

    if ( false !== $cached ) {
        return (float) $cached;
    }

    // For USDT/USD the rate is effectively 1:1, but we verify via API.
    $response = wp_remote_get( 'https://api.coingecko.com/api/v3/simple/price?ids=tether&vs_currencies=usd' );

    if ( is_wp_error( $response ) ) {
        return 1.0; // Fallback for stablecoins.
    }

    $body = json_decode( wp_remote_retrieve_body( $response ), true );
    $rate  = $body['tether']['usd'] ?? 1.0;

    set_transient( $transient_key, $rate, 300 ); // Cache for 5 minutes.

    return (float) $rate;
}
Notice how Claude Code uses WordPress conventions throughout: esc_url() for URLs, esc_html() for output, transients for caching, and wp_remote_get() instead of raw cURL. It also registers hooks outside the class scope, following the WooCommerce best practice that gateway hooks should not live inside the gateway class because they only load on checkout and settings pages.
Step 4 — Set Up Webhook Handling
When a customer sends crypto, the payment confirmation does not happen instantly in your WooCommerce dashboard. You need a webhook endpoint that Aurpay’s infrastructure can call once the blockchain transaction is confirmed. This webhook updates the order status from “pending payment” to “processing” so your fulfillment workflow kicks in automatically.
Ask Claude Code to build this:
> Create a webhook handler for Aurpay payment confirmations. It should verify
  the webhook signature, update the WooCommerce order status, and add an order
  note with the transaction hash.
Claude Code generates the handler as part of your customization plugin:
/**
 * Register the Aurpay webhook endpoint.
 */
add_action( 'rest_api_init', function() {
    register_rest_route( 'aurpay/v1', '/webhook', array(
        'methods'             => 'POST',
        'callback'            => 'aurpay_handle_webhook',
        'permission_callback' => '__return_true',
    ) );
} );

/**
 * Process incoming Aurpay webhook.
 */
function aurpay_handle_webhook( WP_REST_Request $request ) {
    $payload   = $request->get_json_params();
    $signature = $request->get_header( 'X-Aurpay-Signature' );

    // 1. Verify webhook signature.
    $settings   = get_option( 'woocommerce_aurpay_settings', array() );
    $secret     = $settings['webhook_secret'] ?? '';
    $expected   = hash_hmac( 'sha256', wp_json_encode( $payload ), $secret );

    if ( ! hash_equals( $expected, $signature ) ) {
        return new WP_REST_Response( array( 'error' => 'Invalid signature' ), 401 );
    }

    // 2. Extract payment data.
    $order_id   = absint( $payload['order_id'] ?? 0 );
    $status     = sanitize_text_field( $payload['status'] ?? '' );
    $tx_hash    = sanitize_text_field( $payload['tx_hash'] ?? '' );
    $amount     = sanitize_text_field( $payload['amount'] ?? '' );
    $coin       = sanitize_text_field( $payload['coin'] ?? '' );
    $network    = sanitize_text_field( $payload['network'] ?? '' );

    $order = wc_get_order( $order_id );

    if ( ! $order ) {
        return new WP_REST_Response( array( 'error' => 'Order not found' ), 404 );
    }

    // 3. Update order based on payment status.
    if ( 'confirmed' === $status ) {
        $order->payment_complete( $tx_hash );
        $order->add_order_note(
            sprintf(
                'Aurpay payment confirmed. %s %s on %s. TX: %s',
                $amount,
                strtoupper( $coin ),
                ucfirst( $network ),
                $tx_hash
            )
        );
    } elseif ( 'failed' === $status ) {
        $order->update_status( 'failed', 'Aurpay: Payment failed or expired.' );
    }

    return new WP_REST_Response( array( 'success' => true ), 200 );
}
Your webhook URL will be https://yourstore.com/wp-json/aurpay/v1/webhook. Register this URL in your Aurpay merchant dashboard under webhook settings. Claude Code reminds you to do this and can even verify the endpoint is reachable by running a quick curl test against it.
The signature verification step is critical. Without it, anyone could send a POST request to your webhook URL and mark orders as paid. Claude Code adds this by default because it reads Aurpay’s documentation and knows the signature header convention. If you are building invoicing workflows on top of this, see our guide on automating crypto invoicing with AI.
Step 5 — Test the Full Payment Flow
With the plugin installed, checkout customized, and webhooks configured, run a complete end-to-end test. Ask Claude Code to help you set up the test environment:
> Help me test the full payment flow. Create a test product priced at $10,
  place an order using the Aurpay gateway in testnet mode, and tell me what
  to check at each step.
Claude Code walks you through a structured test sequence:
- Claude Code uses WP-CLI to create a simple product:
wp wc product create --name="Test Crypto Payment" --regular_price=10 --user=1 - Navigate to your store, add the product to cart, proceed to checkout, and select “Pay with Crypto” as the payment method.
- Aurpay redirects to a payment page showing the wallet address, QR code, amount in the selected cryptocurrency, and a countdown timer. Confirm all details display correctly.
- Use a testnet faucet and wallet to send the specified amount. Claude Code can help you find the right faucet for your selected network.
- Check your WordPress debug log (
wp-content/debug.log) and the WooCommerce order notes. The order should transition from “pending payment” to “processing” once the webhook fires. - The order note should include the transaction hash, amount, coin, and network, matching the webhook payload format you defined earlier.
If something fails, Claude Code can read your debug.log, parse the error, and suggest fixes. Common issues include: webhook URL blocked by a firewall or security plugin, incorrect API credentials, or WooCommerce Blocks not rendering the custom payment method. Claude Code diagnoses each by checking the relevant configuration files and log entries.
> The webhook is not firing. The order stays on "pending payment" after I
  send the testnet transaction. Debug this.

Claude Code checks:
1. Webhook URL registered correctly in Aurpay dashboard ✓
2. WordPress REST API accessible: curl -I https://yourstore.com/wp-json/ → 200 OK ✓
3. Security plugin blocking POST requests: Wordfence rate limiting detected ✗
   → Solution: Whitelist /wp-json/aurpay/v1/webhook in Wordfence settings
This is where Claude Code saves the most time. Debugging payment integration issues typically involves checking multiple systems: WordPress, WooCommerce, the payment gateway, server firewall, and security plugins. Claude Code checks them all in sequence and narrows down the root cause.
Advanced: Multi-Currency Display
Once your basic integration is working, you can use Claude Code to add a real-time crypto price display on product pages. This shows customers exactly how much a product costs in BTC, ETH, or USDT before they reach checkout, which helps crypto-holding customers estimate costs before reaching checkout.
> Add a real-time crypto price display below the product price on single
  product pages. Show the price in BTC, ETH, and USDT. Cache the exchange
  rates for 5 minutes.
Claude Code generates a lightweight solution using WordPress transients for caching and a public price API:
/**
 * Display crypto price equivalents on single product pages.
 */
add_action( 'woocommerce_single_product_summary', function() {
    global $product;

    $price_usd = (float) $product->get_price();

    if ( $price_usd <= 0 ) {
        return;
    }

    $rates = aurpay_get_crypto_rates();

    if ( empty( $rates ) ) {
        return;
    }

    echo '';
    echo 'Also payable in crypto:';

    $coins = array(
        'bitcoin'  => array( 'symbol' => 'BTC', 'decimals' => 6 ),
        'ethereum' => array( 'symbol' => 'ETH', 'decimals' => 5 ),
        'tether'   => array( 'symbol' => 'USDT', 'decimals' => 2 ),
    );

    foreach ( $coins as $id => $coin ) {
        if ( isset( $rates[ $id ]['usd'] ) && $rates[ $id ]['usd'] > 0 ) {
            $crypto_amount = $price_usd / $rates[ $id ]['usd'];
            printf(
                '%s %s',
                esc_html( $coin['symbol'] ),
                esc_html( number_format( $crypto_amount, $coin['decimals'] ) )
            );
        }
    }

    echo '';
}, 15 );

/**
 * Fetch and cache crypto exchange rates.
 */
function aurpay_get_crypto_rates() {
    $cached = get_transient( 'aurpay_crypto_rates' );

    if ( false !== $cached ) {
        return $cached;
    }

    $response = wp_remote_get(
        'https://api.coingecko.com/api/v3/simple/price?ids=bitcoin,ethereum,tether&vs_currencies=usd',
        array( 'timeout' => 5 )
    );

    if ( is_wp_error( $response ) ) {
        return array();
    }

    $rates = json_decode( wp_remote_retrieve_body( $response ), true );

    if ( ! is_array( $rates ) ) {
        return array();
    }

    set_transient( 'aurpay_crypto_rates', $rates, 300 );

    return $rates;
}
The five-minute cache window balances freshness with performance. For a store with heavy traffic, you could extend this to 15 minutes. For a high-ticket store where price accuracy matters more, reduce it to 60 seconds. Claude Code adjusts the cache TTL based on your requirements when you tell it about your traffic patterns and product price range.
If you are running a Shopify store instead of WooCommerce and want a similar AI-assisted setup, see our guide on using AI to build a crypto checkout on Shopify.
Ready to Go Live?
Skip the boilerplate. Aurpay’s WooCommerce plugin handles wallet generation, payment detection, and settlement so you can focus on building. Install the plugin.